
The idea here is explained more fully over in the post I made about creating this page and the main Toy Making page (link on the right), but the basic premise is that on a very limited budget, I’m attempting to see if it’s possible to create my own toys (at least to the prototype stage to begin with) cast in some kind of plastic at home. I’ll be updating this page on an ad-hoc basis, as money and time are limited to what isn’t already needed for other projects (like eating and sleeping). Click on all images for a larger view.
Part 1 – Materials and set-up
The first thing was to decide what model to make and what to make it out of. As I’d mentioned in my earlier post regarding this, my sculpting skills are somewhat rusty, and space is limited to the need to keep things tidy as possible because I’ll be working on this in my living room.
I decided on Sculpey over more traditional clay as my material to begin with. I’d never used it before, but heard a couple of good things about it online. For one it won’t dry out till you bake it (which you can do in a normal oven) and you don’t need to keep it moist, just cool and out of too much direct sunlight. I bought some Super Sculpey from a local art store, if only because it was all they stocked, but later found out it’s what they used to prototype Gollum and some of the amour designs for LOTR during pre-production, if it’s good enough for them, it’s more than good enough for my purposes. At the same time I got a couple of very cheap plastic clay tools, some armature wire and a sheet of perspex to protect whatever surfaces I work on and keep everything together and easy to tidy away.
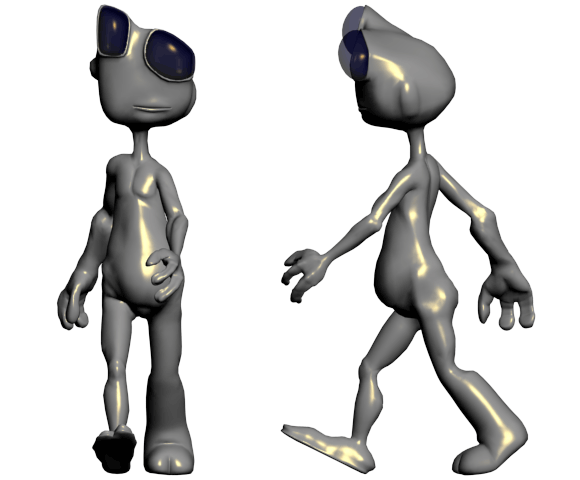
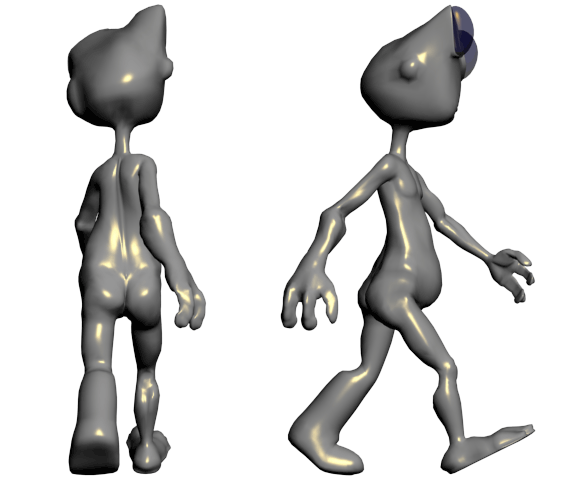
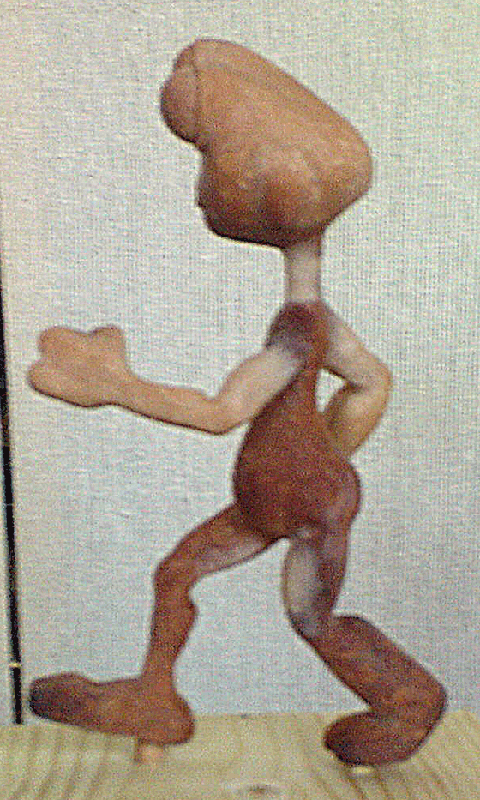
With that out of the way, I just had to decide what to model. The easiest thing was to pick something I’d already designed rather than coming up with something new for this project, so I rendered off a couple of images of my ‘Jerry’ model that I currently use for animation tests.
Part 2 – Making the model
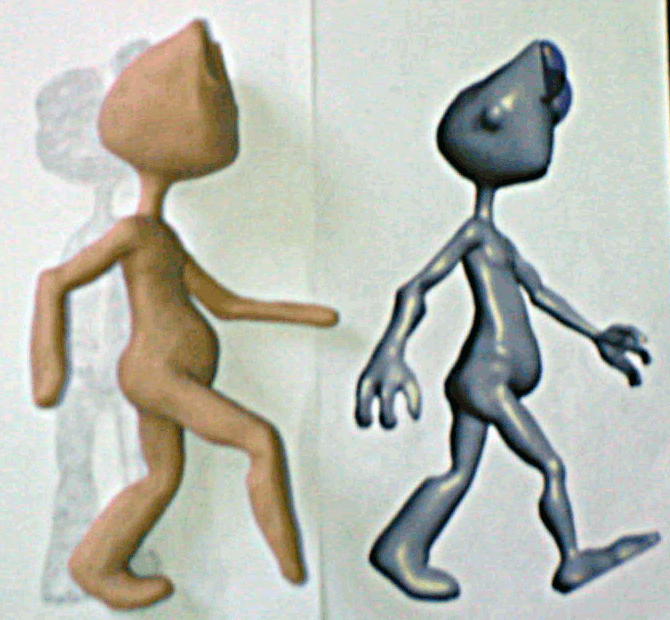
To make things easier on myself to begin with (this project is supposed to be fun after all) I decided to make the model the same size as the sheets I printed off which is roughly 6-7″ (17-18cm). Although I’d eventually like to make key chain size toys, I figured this would be much better size to ‘get my hand back in’. I also decided not to worry too much about getting the proportions and details exact on this version, as long as I felt that it was a good enough representation of my CG design(which admittedly is still a work in progress anyway, I’ve yet to decide on my final texture etc. for him) and captured the overall feel of the character that would be good enough (also see my previous comment about this being for fun).
The first step was to build an armature out of wire (which I knocked up in a couple of minutes and forgot to take a photo of), and then rough out the basic shape in Sculpey over the wire. (If I get a chance I will take better photos, these were taken with my new phone in my poorly lit living room. I’ve yet to play with the camera on my phone to see which lighting conditions and settings take the best photos)
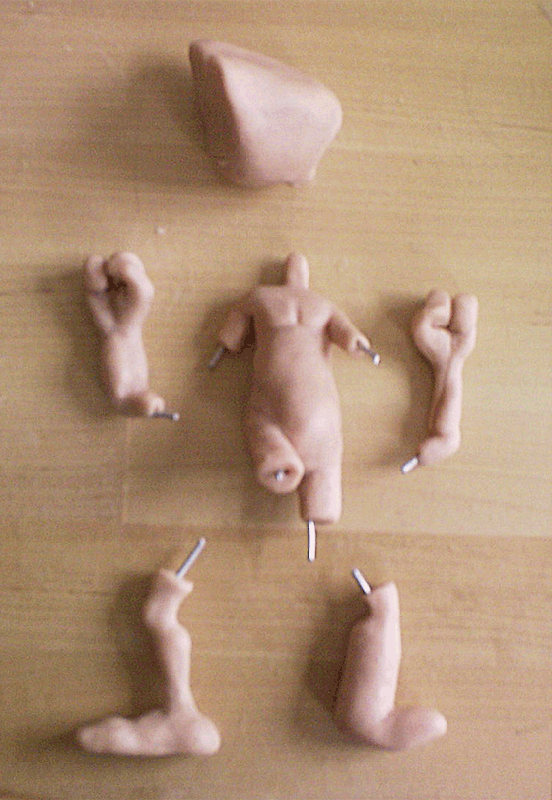
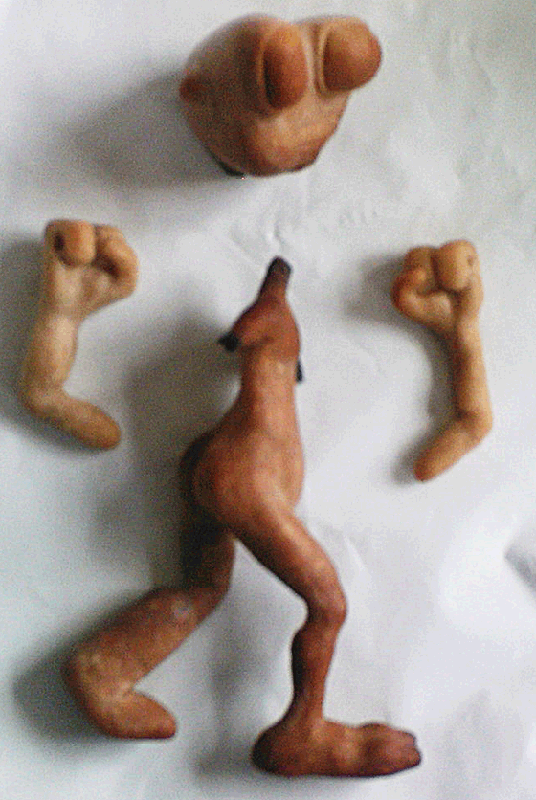
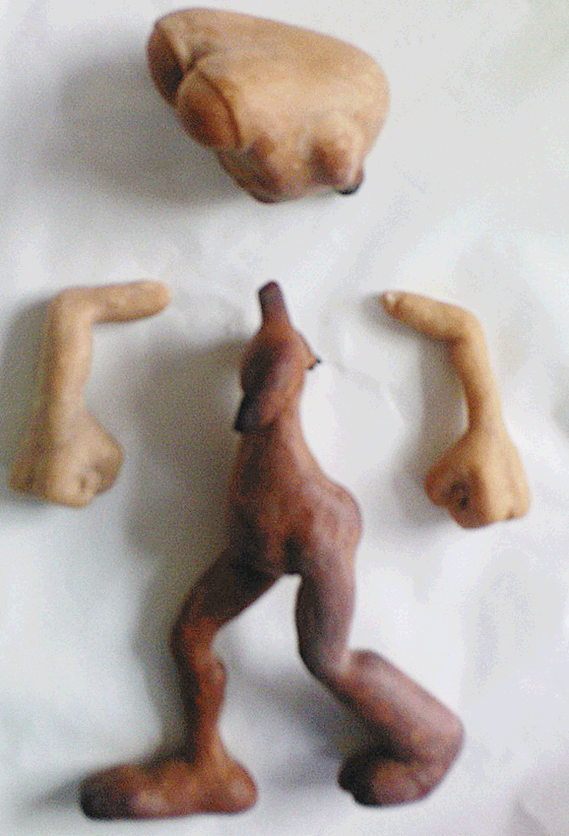
At this stage I started to realise that despite the size of the model it was still quite hard to begin adding any detail especially to the extremities without damaging what I’d already done, and that in future I should build the armature in pieces (learning is as much a part of this process as having fun), and either buy or make a stand to hold the model and make it easier to work on sections without gripping problem areas. The temporary solution, as I was fairly happy with some of the shapes I had and didn’t want to start over completely, was to very carefully remove part of the Sculpey from the armature on the arms, legs and neck, cut the wire, and then add the removed sections back onto the torso, to make it easier to line up and re-attach the limbs when they’re finished. At this stage most of the limbs and torso are nearly complete, with facial features and a little more finer detail to be added.
Part 3 – Finishing the model
Stage 1 – Reassembly and Baking
After I was fairly confident I’d got all of the separate pieces relatively finished I decided it was time for re-attaching the limbs before final smoothing prior to baking. This is where I realised my folly, both in rushing the original armature, and in the hasty decision of cuts detaching limbs. Whilst I still think that was the right thing to do for this model, it left me with very small sections of Sculpey to hold the new limbs on at re-attachment, and due to it’s design with thin arms legs and neck, but very large hands feet and head combined with the ‘walk’ pose I’d chosen I was about 2 pairs of hands short when it came time to try and support the model, support the limb, and apply extra Sculpey to smooth over these areas. I was successful getting the legs re-attached, but when I tried to add the head and arms I was in serious danger of damaging all of my work so far. I tried building supports from wire and extra Sculpey and putting it together on the old baking tray I was going to use so it wouldn’t need to move once assembled, but the model as just too unsteady to hold it’s position and shape for the entire baking period.
I abandoned the idea of baking the model whole and finishing the smoothing (when cold the Sculpey has a slightly rubbery texture making it hard to get really smooth areas without deforming neighbouring sections), and popped it in the oven as it was. I worked out the time the model would need to bake right through the thickest sections and after 15 mins or so realised another mistake. DON’T bake a model with very large variations in thickness in an unreliable gas oven, only an hour or so before it’s time to cook dinner! Some of the very thin end parts burnt till black, and slightly thicker areas were scorched, leaving an interesting odour in my oven, kitchen and rest of the house for a large part of the evening (I’m just glad it wasn’t pizza night, and we could use the grill and hob to cook dinner. Mmmm pizza.)
You can drill and sand hardened Sculpey (thankfully) so I should still be able to re-attach the arms and head, and smooth over the areas with extra Sculpey (I’m unsure if this will survive re-baking though, but that’s a problem for another day). The only real issue now is the extra amount of work need to get a nice smooth finish on the model.
I’ve been told (cheers Jamie) that there’s a higher grade grey super sculpey ‘Firm’ which I’ll make sure to look out for next time rather than using whatever I find first, as this would be much better for carving fine detail and smoothing before baking. I’ll also make sure that next time I plan out the armature (and possible stands, supports, detachable parts etc.) much more carefully before the clay stage. After a quick look on the sculpey site too I believe it might be possible to add onto pre-baked sections, and thus ‘layer up’ thicker areas so the final detail layer only needs baking once for the a much shorter period (this bears further investigation before the next model).
Stage 2 – Finishing
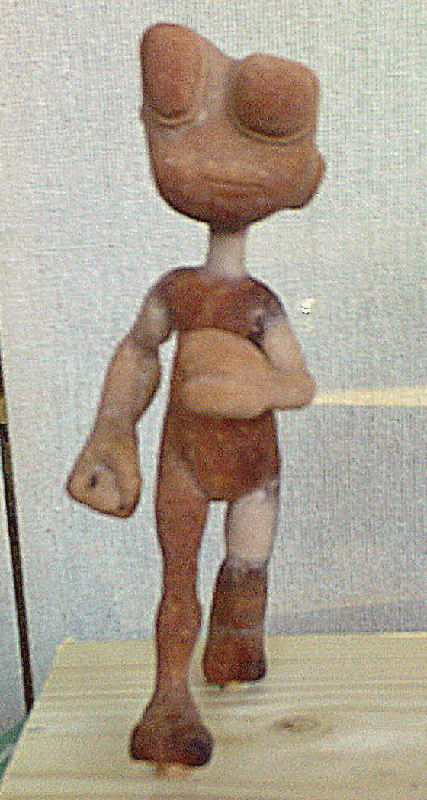
After much less time than I thought (thanks to a couple of files and 3 grades of sandpaper) I had all of the pieces nice and smooth ready for re-assembly. I drilled pilot holes into the neck and arms on the model and corresponding holes in the arms and head. I then glued the pieces together with some short lengths of the armature wire (I could have used stronger wire but this allowed me some leeway with hole positioning as I could still bend the head and arms into the correct position) and the tiniest amount of super glue, and then applied more sculpey to build up the areas around the joins to the correct shape and size, and to one or two areas where I had removed too much material during the sanding. I did intend to take pictures before and after adding the sculpey, but got carried away with my progress and forgot.
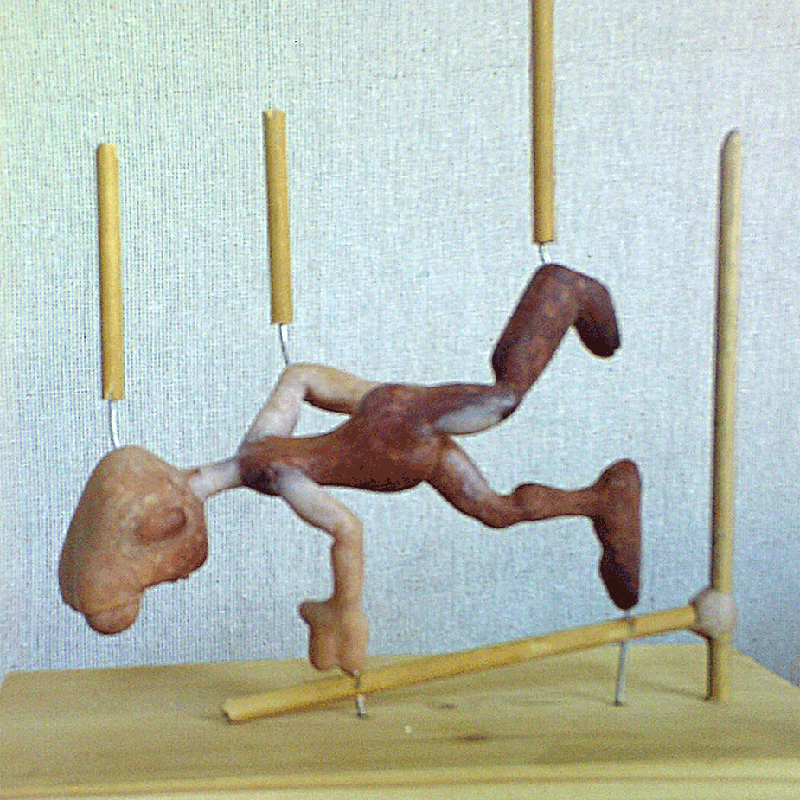
I next drilled a hole in the foot for a dowel and stood Jerry up on a piece of wood to hold his position during baking. I was aware that it would only need 15 mins baking this time as the join sections were quite thin, but waited till after dinner this time just in case. I needn’t have worried although you wouldn’t have wanted to cook in the oven immediately after, I managed to leave the kitchen relatively scent free this time. The thing I did discover, is that the pre baked sections go rubbery when re-heated, so Jerry fell off his stand, luckily it hadn’t gone soft enough to do any damage, so all I had to do was hold him in place for a while as he cooled (with gloves, he left the oven fairly hot) to ensure the legs retained their correct position. After a little more sanding the model was ready for mold preparation.
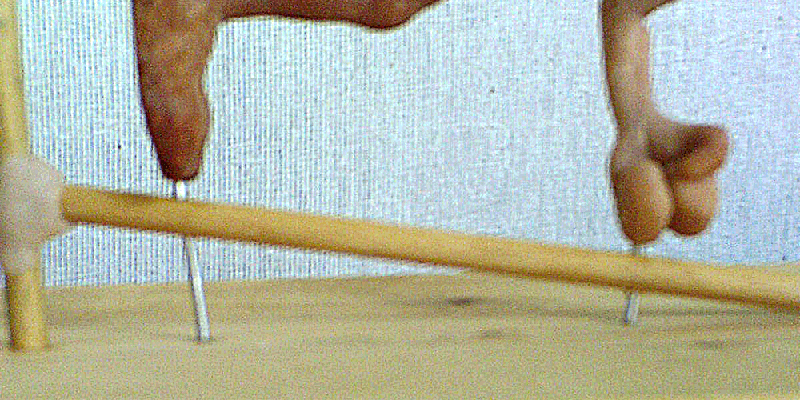
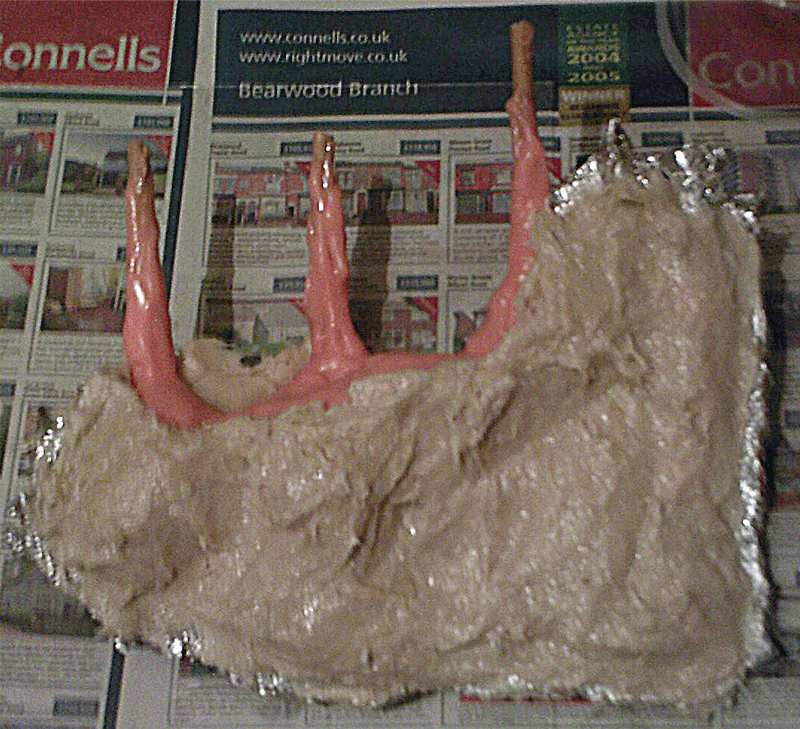
Next I had a good long think about the best way to prepare the model for mold making, and although I’m sure there are probably better, and simpler solutions, I came up with the following set-up. This will hopefully allow me to pour the resin in from the top where it will run to the lowest point on the model and fill it from the bottom up, this way it should eliminate any air bubbles. I then drilled and attached some sprues to the highest points of the model, where as it fills air is most likely to get trapped. This should allow the air to escape, and me to be able to see when the mold is full.
Part 4 – Making the Mold
Stage 1 – Silicone
After a little research into what materials to use for making the mold, along with costs, availability and ease of use I decided on some Smooth-On products, Rebound 25 brush on silicone for making the initial mold and Plasti-paste for making the mold support shell to support the silicone during casting. There’s also a handy tutorial on their site of both products being used. You can get smaller ‘trial size’ packs of these products, so I didn’t have to buy bulk for the purpose of this project, and also helped with keeping costs down. There is a relatively nearby UK distributor (buying direct from the US would have been even cheaper, but they don’t ship orders as small as mine overseas unfortunately). I ordered these along with some resin and mold release (you don’t need this with silicone apparently but I decided to get some as I didn’t want to take my chances of the silicone not setting because of the sculpey) about halfway though the model making process so it was already here when I was ready to start.
The good thing about this silicone is that it’s a simple equal parts two piece mix (mix 1 part A with 1 part B). I set up up my work surface (several weeks worth of saved newspapers over the dining room table and everything else moved well out of the way in case of spillage). I’d bought some plastic cups and disposable cutlery (I wanted wooden ice-lolly type sticks but couldn’t find any) from my local ‘everything £1’ store for measuring and mixing. After initially trying to pour an equal amount of each part into it’s own cup and then pouring one into the other to mix I soon discovered that as it’s very thick and doesn’t pour easily the best way to measure the parts out was with the disposable spoons and mix with the disposable knives in a single plastic cup. I got pack of brushes (again for £1) in case I needed more than one and used one of these to apply my layers of silicone. If I’d had more funds available I would also have got hold of some of the pigment the afore mentioned tutorial recommends to help differentiate between layers, but as a compromise went slightly overboard on each layer, so I could easily see (I hope) any problem areas. I used my Girlfriends hair-drier for 5 minutes or so after applying each layer to speed up the process and only had to wait 30-40 mins between applications as opposed to the 60 estimated on the packaging. As it is I think I’ve only used batween a third and half of the silicone, so still have some left for future attempts if this mold doesn’t work, or extra models and molds if it does.
This process was relatively painless, although next time I would spend longer planning out the pre mold stage, as my set-up could have been more stable, and I did miss one of the high points of the model that could use another sprue (the other foot) and will have to see if I can add this in before the next stage. I’d also advise anyone else to get hold of a non water based hand wash or solvent etc, as normal hand washing doesn’t remove silicone or it’s by products easily and to get hold of some vinyl gloves (latex ones will inhibit the curing process). I forgot these steps and spent a few minutes not being able to touch anything followed by rubbing off sections of set silicone from my hands, and then having to borrow my girlfriends nail varnish remover to get rid of the last remnants.
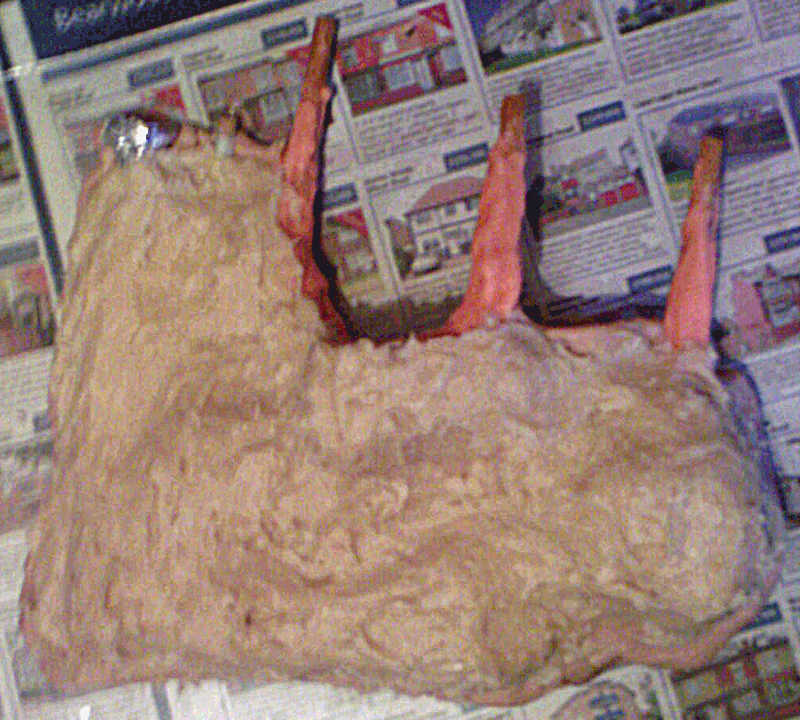
Stage 2 – Support Shell and De-Molding
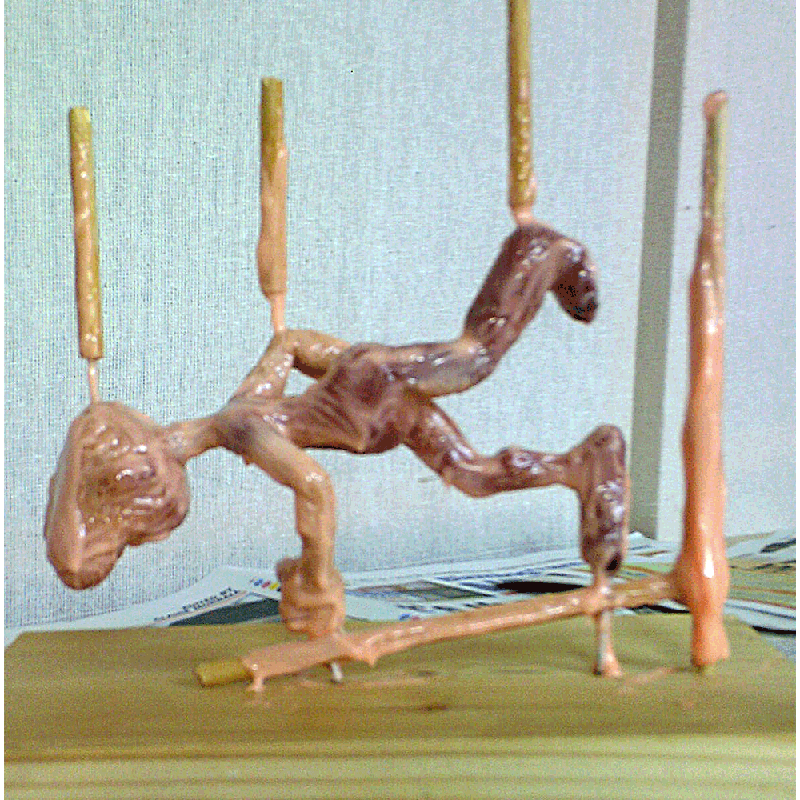
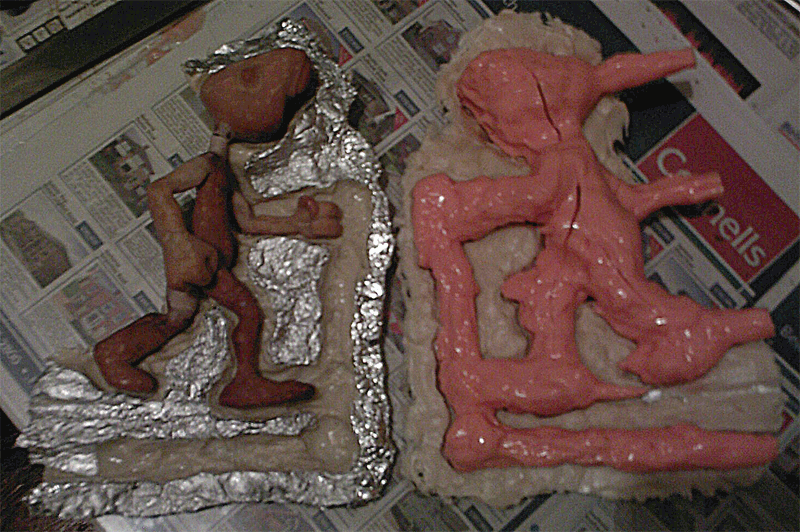
After leaving the silicone overnight to fully set I planned out a very simple support shell in 2 sections to make it easy to remove. I lay the mold on it’s side and built up around it to about half-way (or just below) with sculpey ensuring there were no large undercuts, and then mixed and applied my layer of Plasti-Paste (after a generous layer of release agent). I only had to wait 90 minutes for this to harden, so then I flipped the mold over, removed all of the sculpey, applied some aluminium foil to the visible sections of Plasti-Paste, more release agent, and then mixed and applied my second half of the support shell. Again this only needed 90 minutes to harden, at which time I was able to pry the pieces apart.
Now came the difficult manoeuvre of removing the silicone mold from the model with as few incisions as possible, and due to my hasty design found I had to make a few more than I would have liked, but hopefully with the support shell holding the mold firm and together and the tendency of the silicone to resume it’s shape I guessed come casting time there would be little leakage (hopefully none). Despite being careful, the model was slightly damaged during the de-molding, but only in the repair areas at the arms and neck where there were separate pieces joined by very thin sections of hardened sculpey, and they are easily rectified in the same manner as before.
Part 5 – Casting
Now the good part (or so I thought) where I just pour in a load of goo and then a few hours later out pops a perfect lightweight durable replica of my hand crafted model. Re-assembling the mold sans model and bracing it closed and upright with a g-clamp was very easy, likewise mixing the resin was as straight forward as any of the previous solutions.
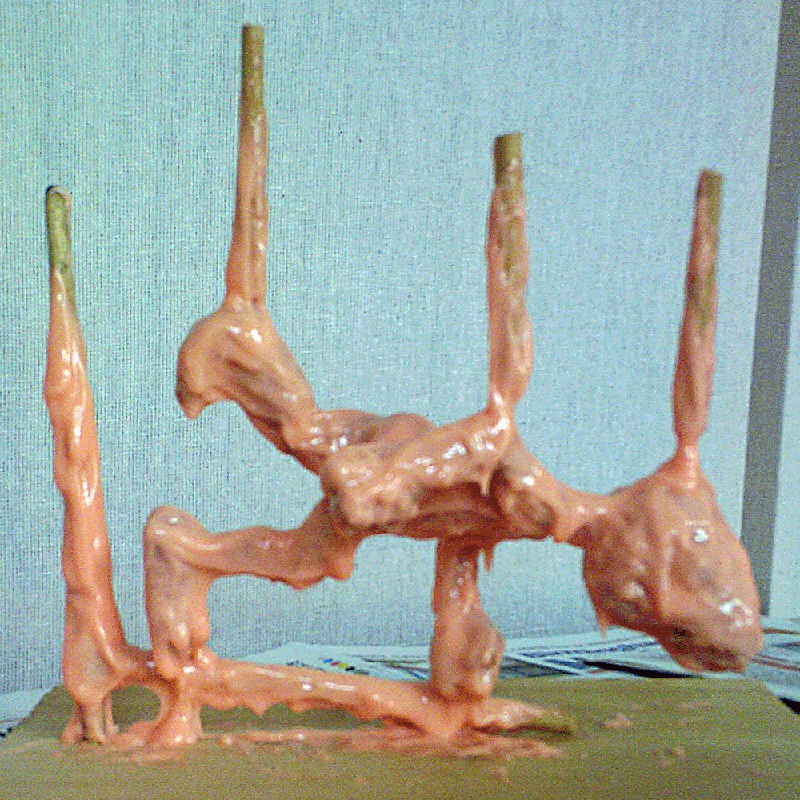
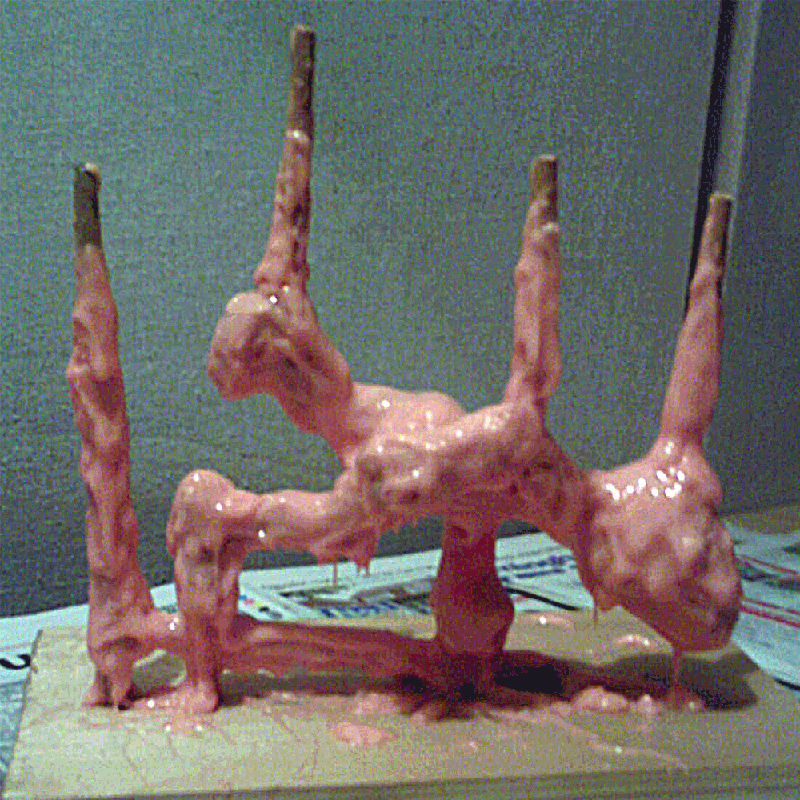
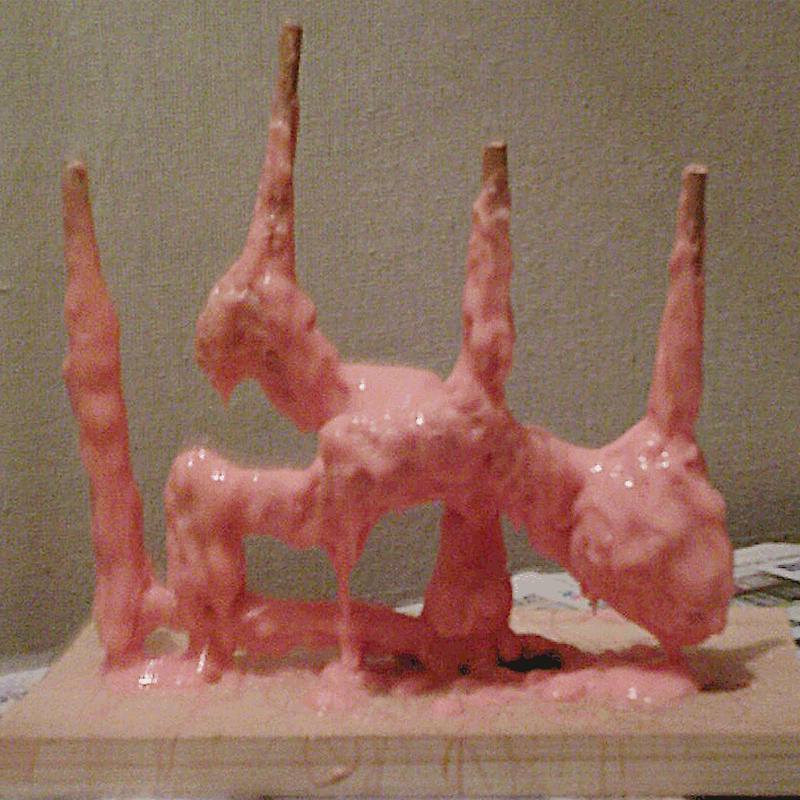
I’d already done a volume substitution with my original model, by pushing it into a full jug of water that sat in a bowl, and measuring the volume of the water displaced to see how much resin I would need. I’d also created a simple funnel from paper and tape as I’d meant to incorporate it into my design but forgot in my rush to get to this stage. Both parts of this resin needed pre-mixing before adding together as it separates into powder and liquid in transit, so having acheived this and then mixing together, I poured away into my mold. Unfortunately, most of the resin stayed in the funnel and didn’t work it’s way through my mold as planned, after discarding the unused resin, waiting for what was in the mold to set and opening it up I found this:-
I’ve concluded that a combination of mold design (bottom filling with narrow gaps for the resin to pass through into the mold proper) and an very viscous yet incredibly lightweight resin meant that even with the weight of an almost entire models worth of resin behind it , it wasn’t enough to force itself through all of the gaps and throughout the mold, it only got as far as the first ingress point, (filling the foot) and then the pressure wasn’t sufficient to carry on pushing it through.
I may attempt to re-use this mold at a future point with a much less viscous resin (there are some available with a watery consistency when mixed) which hopefully will be able to make it through the entire mold. This will have to wait until I can generate some more funds to experiment with, in the mean time I will try and come up with another mold design, (perhaps top filling) with much larger air gaps to allow free flow of the thicker resin.
4 Replies to “First Attempt”